Building an ESP32 NAT Router / Wi-Fi Repeater for Weak Smart Home Corners
Instead of buying expensive mesh nodes for a single smart home device in a dead zone, I flashed a cheap ESP32 with esp32_nat_router and added a simple REST sensor in Home Assistant to keep an eye on its Wi-Fi signal.
Every smart home eventually hits the same annoying wall: literally a wall. You put a device somewhere useful—like a Wallbox in the garage or a smart meter reader like my WattWächter in the basement—and suddenly your Wi-Fi signal drops to unusable levels. Buying a full-blown mesh node just to get a single IoT sensor online feels like overkill.
So I went the cheap DIY route instead: an ESP32 running the esp32_nat_router firmware. For just a few euros, it turns an ESP32 into a compact Wi-Fi NAT router that bridges a weak corner back to your main network.
Why a NAT Router Instead of a "Real" Repeater?
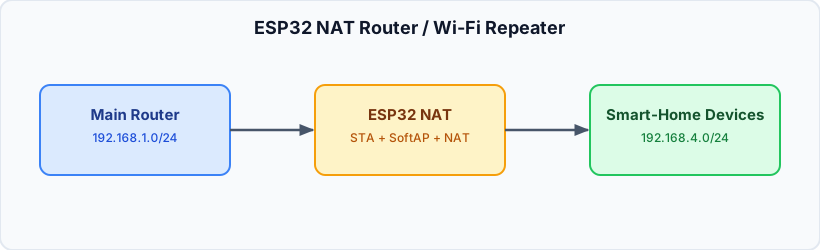
Most people expect a repeater to be a transparent Layer 2 bridge, where every device sits in the exact same subnet. esp32_nat_router works differently: it routes between its own Access Point (AP) subnet and your main Wi-Fi (STA) uplink using NAT.
For a smart home setup, that's actually fine—and sometimes even nice. My Wallbox or WattWächter only needs to talk to Home Assistant or an MQTT broker on the main network anyway. If you ever need to reach a device behind the ESP32 from the main LAN, the firmware supports DHCP reservations and port forwarding. (If you really need a Layer 2 bridge, the same author has an experimental esp32_wifi_repeater branch, though NAT has been rock-solid for me.)
Flashing and First Boot
The best part about this project is how painless the setup is. You don't even need to compile anything:
- Plug the ESP32 into your computer via USB.
- Open the ESP32 NAT Router Web Installer in a Web Serial-compatible browser, pick your chip (it supports ESP32, ESP32-C3, C5, C6, S3, and even WT32-ETH01 for Ethernet), and click Connect & Install.
- On first boot, the ESP32 spins up an open Wi-Fi network called
ESP32_NAT_Router. - Connect to it, open
http://esp32-nat-router.local(orhttp://192.168.4.1), enter your main Wi-Fi credentials and your new AP SSID/password, and hit Save & Reboot.
That's it. Within a minute, you have a working mini-repeater.
Monitoring Signal Strength in Home Assistant
Since these little routers sit in tricky corners, I wanted to know if their uplink signal ever degrades. The router's status page already shows the uplink RSSI (e.g., Connected (-68 dBm)), so I added two simple REST sensors in Home Assistant's configuration.yaml—one for my WattWächter (192.168.8.140) and one for the Wallbox (192.168.8.139):
  - resource: "http://192.168.8.140/"
    scan_interval: 30
    sensor:
      - name: "ESP32 NAT Router WattWächter WLAN Signalstärke"
        unique_id: "esp32_nat_router_wattwaechter_wifi_signal"
        value_template: >-
          {% set match = value | regex_findall_index('Connected \\((-?\\d+)\\s*dBm\\)', 0) %}
          {% if match is defined and match | int(default=none) is not none %}
            {{ match | int }}
          {% else %}
            {{ states('sensor.esp32_nat_router_wattwachter_wlan_signalstarke') }}
          {% endif %}
        unit_of_measurement: "dBm"
        device_class: "signal_strength"
        state_class: "measurement"
        icon: "mdi:wifi-arrow-up-down"
The else fallback is a small trick I like: if a scrape ever fails for a second, it keeps the last known value instead of cluttering my history with unavailable.
Honest Limitations
It's a €3–5 microcontroller, not a Ubiquiti access point. Throughput tops out around 5–15 Mbps, and RAM limits you to 8 simultaneous Wi-Fi clients (5 on an ESP32-C3). If you turn on extra features like WireGuard VPN, PCAP capture, or the firewall ACLs, you'll eat into that RAM even faster.
For one or two smart home devices in a dead zone, though? It's cheap, reliable, and honestly a fun little weekend fix.