DIY CO2 Monitoring with an ESP32 and SCD4x Sensor
How I built a reliable DIY CO2, temperature, and humidity sensor using an ESP32, an SCD4x sensor, and ESPHome—including manual outdoor calibration buttons for Home Assistant.
If you work from home or spend a lot of time in a closed room, you've probably noticed how quickly the air gets stuffy. High CO2 levels make you tired and unfocused long before you actually feel like opening a window. Instead of buying an expensive off-the-shelf air quality monitor that locks me into some cloud app, I built my own with an ESP32, an SCD4x sensor, and ESPHome.
Hardware: Why the SCD4x (and Why I Switched to ESP32)
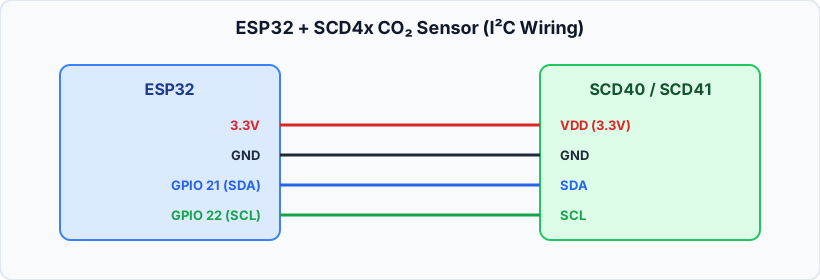
The Sensirion SCD4x (like the SCD40 or SCD41) is a tiny, true photoacoustic CO2 sensor—not one of those cheap eCO2 sensors that just guess CO2 from volatile organic compounds. It also measures temperature and humidity, and it talks over I2C, which means you only need four wires: VCC, GND, SDA, and SCL.
I originally started with an ESP8266 (D1 Mini), which worked fine on my desk, but I eventually moved the setup to an ESP32 (esp32dev using the esp-idf framework). With the ESP32, I get rock-solid Wi-Fi, an onboard web server (web_server v3) for quick debugging, and plenty of headroom for extra diagnostics like Wi-Fi signal strength and free heap.
On the ESP32, I wired the SCD4x to the default I2C pins:
- SDA:
GPIO21 - SCL:
GPIO22 - Frequency:
50kHz
The ESPHome Configuration
Here is the core part of my esphome-esp32-co2.yaml configuration for the I2C bus and the SCD4x sensor:
i2c:
  sda: GPIO21
  scl: GPIO22
  scan: true
  frequency: 50kHz
  id: bus_a

sensor:
  - platform: scd4x
    id: my_scd4x
    i2c_id: bus_a
    automatic_self_calibration: false
    co2:
      name: "CO2"
    temperature:
      name: "Temperature"
    humidity:
      name: "Humidity"
    update_interval: 10s
A few things I learned the hard way:
- Disable
power_save_modeon Wi-Fi: Settingpower_save_mode: nonekeeps the connection responsive and prevents random dropouts. - Turn off
automatic_self_calibration: By default, the SCD4x assumes it sees fresh outdoor air (~400–420 ppm) at least once every week or two and slowly drifts its baseline. If the sensor sits in a room that rarely gets aired out completely, automatic calibration can actually skew your readings. I turned it off.
Manual Calibration Buttons in Home Assistant
Since I disabled automatic self-calibration, I wanted an easy way to calibrate the sensor manually whenever I take it outside for a few minutes. ESPHome makes this super clean with template buttons:
button:
  - platform: template
    name: "Calibrate CO2 (Outdoor 420 ppm)"
    icon: "mdi:target"
    entity_category: config
    on_press:
      - scd4x.perform_forced_calibration:
          id: my_scd4x
          value: 420

  - platform: template
    name: "Reset SCD4x to Factory Calibration"
    icon: "mdi:restore"
    entity_category: config
    on_press:
      - scd4x.factory_reset:
          id: my_scd4x
Now, if I ever feel like the numbers are drifting, I just plug the ESP32 into a power bank, put it outside on the windowsill for 5 minutes, and hit Calibrate CO2 (Outdoor 420 ppm) in Home Assistant. If anything goes wrong, the factory reset button is right next to it.
Was It Worth It?
Definitely. For a few euros and 15 minutes of soldering and flashing, I have a fast, local-only CO2 sensor updating every 10 seconds in Home Assistant. I use it to trigger a notification when CO2 crosses 1000 ppm—and honestly, it's been the best reminder to actually open a window during long coding sessions.